DOs and DONTs: Link Sharing

Creator Community, if you’re a veteran content creator you know well and good what we’re about to talk about! 

Promoting links or landing pages is a key part of influencer marketing, helping bridge the gap between content and conversions. However, how influencers promote these links can make or break the campaign’s success. Here are some essential dos and don’ts to ensure your link-promotion strategy is effective and audience-friendly. 

The Dos

  1. Use Authentic Messaging
    Always craft captions and videos in a way that feels natural to your personal brand. Audiences can easily detect insincerity, so incorporate some kind of personal touch before asking viewers to head over to the link. 
  2. Leverage Call-to-Actions (CTAs)
    Encourage your audience to take action against a certain issue with clear and engaging CTAs. Phrases like “Swipe up to learn more,” “Click the link in bio for exclusive details,” or “Discover the benefits here” drive interest without feeling pushy or heavy handed.
  3. Track Performance with Unique Links
    Use trackable links, such as UTM codes or custom URLs, to measure click-through rates and engagement. This provides valuable insights for both you and the brand. Without UTMs, it’s hard for influencers to measure how many clicks they drove and take credit for the results that they garnered. 
  4. Tailor Content for Platforms
    Adapt your promotion strategy to fit the platform. For example, Instagram Stories work well with direct swipe-up links, while YouTube might require verbal prompts and a link in the description. One strategy for TikTok that we love is pinning the URL as the top comment! 

The Don’ts

  1. Don’t Overwhelm with Links
    Bombarding your audience with too many links in your LinkTree, or reallllyyy long URLs, can dilute your message and feel spammy. Focus on quality over quantity, and ask the brand if they’d be willing to use bit.ly to keep URLs nice and concise. 
  2. Avoid using in your Instagram caption
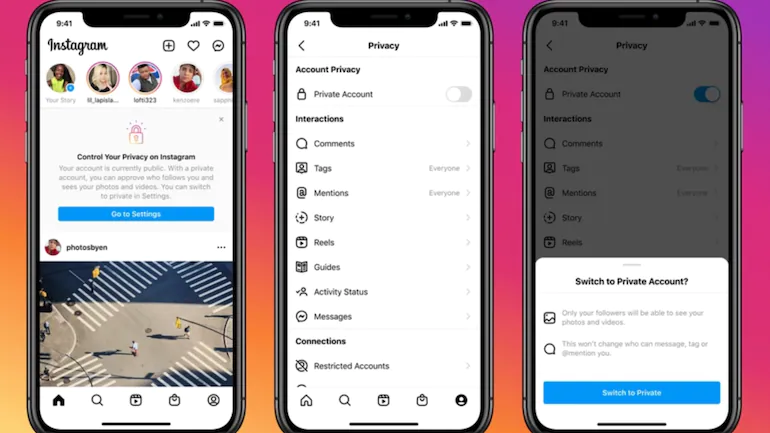
    Whatever you do, avoid adding a URL in your Instagram caption. This red flag quickly makes brands seem out of the loop, as users can’t easily click it! Talk with your brand to see how you can go about promoting the link in a more “accessible” spot. 
  3. Don’t Skip Personalization
    Posting generic captions or promotions can feel robotic. Always take time to explain why the product, fundraiser, petition, etc. is relevant to you and your audience.
  4. Don’t Ignore Mobile Optimization
    If the landing page isn’t mobile-friendly, your audience may leave without engaging. Always test the link yourself to ensure it provides a seamless user experience. Flag any bugs or errors with your brand — they’ll appreciate your extra pair of eyes. 

FAQ: “Why Can’t I Negotiate My Rate?”

Hey creator community~

Have you ever wondered why you are unable to negotiate your rate on certain campaigns? That’s because some campaigns have fixed rates set in place! 

Unfortunately, for these campaigns, we won’t be able to accept negotiations, even if we really want to! So if you’re not satisfied with the rate, no worries~ Just wait and apply for a later campaign that better fits your needs! There will always be other opportunities so be sure to keep an eye out on the Creator Portal so you don’t miss out.

Tips for Our Creator Community

With new campaigns continuing to roll out, we compiled a list of tips to help the creator community navigate Meta’s Collaboration posts:

  • Editing rights for a post are exclusive to the original publisher. Should they make any changes, collaborators won’t receive notifications, underscoring the importance of carefully selecting collaborators for this feature.
  • Regardless of where viewers encounter the post, the original publisher’s handle will always appear first in the header.
  • The caption will display only the original publisher’s handle.
  • The post will populate both account feeds.
  • While both parties have access to post insights, only the original publisher “gets credit” for the overall Insights.
  • Profile insights—including metrics such as new follows, email button taps, and profile visits—will be confined to the original publisher’s profile.
  • If this feature will be used for a brand collaboration, it must adhere to FTC guidelines for disclosure and employ appropriate branded content partner tools.

Thank you to @simplysocialnm for compiling this guide on collabs! For more social media tips, click here to check out their Instagram.

Creator Portal: Update Your Payment Destination Today!

This Monday, People First finally made the transition from Stripes to Dots!

All creators should make their way to the Creator Portal and update their payment information. Simply head over to your Profile > Payout Center. From there, you’ll receive a text to your phone with your OTP verification code. Enter this, and from there you can select your preferred “Payment Destination,” including PayPal, Venmo, Cash App, or a direct deposit into a Bank Account.

Note: though every creator is encouraged to update their payment information, those who are currently participating in a campaign or waiting for a payment MUST select a new Payment Destination! 
If you have any concerns or questions regarding this update, please do not hesitate to reach out to our Finance Team via [email protected].

Creator Tips: Maximize Your Meta Presence

In today’s digital world, where various social media platforms are interconnected, linking your accounts can create a more seamless and enhanced online experience. 

Here’s how you can connect your Instagram account with your Facebook account:

  1. Open Instagram on your mobile device and tap on your profile picture in the bottom right corner to go to your profile.
  2. Tap the three horizontal lines in the top right corner. 
  3. Select “Settings and privacy”.
  4. Under “Your account,” select “Accounts Center”.
  5. Scroll down and tap on “Accounts”.
  6. Here you can view the accounts that are currently linked to your Instagram account and add or remove accounts.
  7. To add your Facebook account, select “Add accounts”.
  8. Select “Add Facebook account” and grant the necessary permissions.
  9. Finally, confirm the linking.

Note: If you are linking your Instagram account to a new Facebook account, be sure to add a profile picture and any relevant information to your Facebook account. 

Here’s how you can connect your Facebook account with your Instagram account:

  1. Open Facebook on your mobile device and tap on your profile picture in the bottom right corner to go to your profile.
  2. Tap the Settings icon in the top right corner. 
  3. In “Settings and privacy,” select “See more in Under “Accounts Center”.
  4. Scroll down and tap on “Accounts”
  5. Here you can view the accounts that are currently linked to your Facebook account and add or remove accounts.
  6. To add your Instagram account, select “Add accounts”
  7. Select “Add Instagram account” and grant the necessary permissions.
  8. Finally, confirm the linking. 

Why should you link your Instagram and Facebook accounts?

Linking your Instagram account and Facebook accounts will unlock Meta’s Business Suite, a platform that allows for effortless content sharing and advanced ad targeting, houses notifications and insights for both applications, and potentially increases both engagement and reach.

Best Practices for People First’s Creators

Hey Creator Community~

Here at People First, we take pride in working with everyday social media users to bring a sense of authenticity and relatability back to marketing campaigns. That being said, many of our creators have never partnered with a brand or organization before nor have participated in a social media campaign.

To help all of our creators, both new and experienced, we compiled a list of best practices to use when partaking in paid partnership opportunities:

  • Authenticity is key: with the oversaturation of social media content, the best way to stand out is to be authentic to yourself. Stay true to your personal brand and values. Choose campaigns that align with your story and resonate with your audience. 
  • Know your audience: at the heart of effective content creation is understanding your audience. Tailor your content so it seamlessly relates to both yourself and your audience.
  • Build relationships: many of our partners host multiple campaigns through People First. If you find a partner that you feel a genuine connection with, build a relationship with them, and People First, by applying to multiple campaigns. There are many benefits to establishing these connections, one of which is whitelisting. 
  • Quality over quantity: focus on creating high-quality content that is both well-thought-out and visually appealing. Make an impact with your content. 
  • Be transparent: honesty builds trust and credibility. 
  • Think outside the box: if the campaign you are working on requires the promotion of a product, think outside the box of product promotion. Try to make your content engaging by using creative storytelling, behind-the-scenes content, or unique ways of showcasing the brand’s values. 
  • Respect deadlines: be sure to meet deadlines when it comes to submitting content for approval or posting live content. If for some reason you are unable to meet a deadline, be sure to communicate with the DRO assigned to your campaign. 

These best practices are just a few suggestions aimed at ensuring smooth collaboration between you, as a creator, us at People First, and our partner. Remember to do what feels right for you and always reach out to us if you have any questions or concerns.

Creator Tips: Your Guide to Pre-cleared Sounds for TikTok and Meta

Are you looking for new ways to improve your social media content or to increase your engagement? Try adding sounds for your next post on TikTok, Facebook, or Instagram! The simple act of adding background music, whether it be a trending song or popular audio intensifies the impact of the video and can lead to increased engagement. What’s more, is that using music that is already authorized by the platform will prevent any issues related to copyright infringement and minimize the likelihood of your post being removed or muted. This is super important for content creators — since sponsored content may not contain sounds that are ineligible for commercial use.

Here are some guidelines and useful tips for using authorized sounds for TikTok and Meta Platforms, Facebook and Instagram. 

For TikTok:

  • When uploading or recording a video on TikTok, you will have the option to add sounds to your videos.
    • If you’re recording a new video, you can add sounds by tapping the Music Note located at the right of your screen. 
    • If you’re uploading a saved video, click “Add Sounds” at the top of your screen to browse the audio collection. 
  • Note that some sounds displayed on this page may not be available for commercial use, so be sure to select “Commercial Sounds” in the dropdown menu. All of the sound options will be commercial sounds and therefore OK to use in sponsored content. 
  • You can also find viral sounds in the TikTok viral playlist.
  • Click here to access TikTok’s pre-cleared audio library.
    • In this audio library, you’ll be able to browse trending songs under the trending sounds, but stick to using songs marked “Approved for business use”

For Facebook/Instagram:

  • Click here to access Meta’s pre-cleared audio library.
    • Note: you will need a Facebook account.
  • You will have to manually search for the song on Instagram.
  • You will be able to filter search results based on various categories including genre, mood, duration, and more. 
  • Once you find a sound you’d like to use, input it into the app!
  • Although there is no direct way to view all trending sounds, these sounds will have an arrow pointing in the top right direction.

Creator Tip: Authenticate Your Facebook Account

Hey there Creator Community,

Are you looking for more ways to get involved with future paid partnership opportunities with People First?

Here’s an insider tip for you – as the 2024 election nears, we’ll be needing more creators, like yourselves, to spread important campaign messages, so be sure to authenticate your Facebook account to have “priority” for future political campaigns~

We are prioritizing accepting applications from individuals whose’ Facebook accounts are authenticated so that we can whitelist the posts, which will benefit both the creator and our campaigns!

If you’re interested in authenticating your Facebook, follow the instructions below:

  1. Log In & Head to Settings: Go to Facebook and log in to your account or create a new account. Once you’re in, click on the small circle with your profile picture in the top right corner, choose “Settings & Privacy,” and then click on Settings. 
  2. Find Account Settings: In the settings page, choose “Account Settings” from the left-hand menu. 
  3. Confirm Your Identity: Be sure you are in the “General” section then click the “View” button next to “Identity Confirmation”.
  4. Set Up Two-Factor Authentication: Under the “Secure Your Account with Two-Factor Authentication” section, click “Next” and then select your preferred security method. 
  1. Follow the Given Instructions: Depending on which security method you chose, you will be asked to follow instructions to set up two-factor authentication. Choose the settings you prefer and click “next”.

Note: You will be required to keep two-factor authentication on at all times. Turning off two-factor authentication will cause you to lose your ad authorization which will make you ineligible to run ads about social issues, elections, and politics. Additionally, all previous disclaimers and active ads you created will be paused. So be sure to keep two-factor authentication on!

  1. Verify Your Location: Under the “Your Primary Country Location” section, click “Confirm Primary Location.” Next, in the “Enter Mailing Address Section,” enter your information into the fields and click “Send.”

Note: You will receive a confirmation email stating that a letter will be sent to your mailing address that will contain a verification code. 

  1. Verify Your Identity: Once you receive your the letter, enter the verification code in the designated area on the “Identity Authentication” page. You will then be asked to select the type of identification you’d prefer to use, such as a US drivers liscense, state ID card, or passport and upload a picture of said identification. 

ID Requrements…

  • Your ID must be from the country where you want to run ads, and the name of that country must appear on your ID. 
  • If your ID has an expiration date, the ID must not be expired. 
  • Accepted ID types differ by country. Check which forms of identification are accepted in the country you wish to run ads.

Additionally, be sure that the photo you upload shows all 4 corners, is laid flat, is clear and focused, and has a dark background. 

  1. Wait it Out: While the photo ID will be approved or denied in minutes, it may take longer to verify your account.

Note: You may be asked to answer several questions to further verify your identity. 

Click “Finish” to complete the authentication process. 

  1. Check Your Email: Upon verification, Facebook will send a verification email to the email account associated with your Facebook account. 

For more information, click here to check out Facebook’s step-by-step guide for confirming you identity.

After your authenticate your Facebook account, you are ready to start creating amazing posts that we can whitelist to further spread campaign messages!

Maximize Your Creator Portal Experience

With so many new creators joining our creator community, we wanted to take a second to help you all maximize your Creator Portal experience~

Let’s start by walking through the different pages…

Once you log into the Creator Portal, you will notice three tabs on the top center of your screen.

The first tab, labeled “Community,” houses all of our Creator Community blogs, including the one you’re currently reading! The topic of these blogs can range from social media news to company updates to helpful tips for our creators. These blogs are uploaded twice a week, on Wednesdays and Fridays, so be sure to keep an eye out!

The second tab, labeled “Campaigns,” houses all of our available campaigns. Here you can find all of our active paid partnership opportunities along with any campaign details and requirements. This is also where you will be able to track the progress of your campaign application from the submission of content to approval, so be sure to check the page frequently!

If you find a campaign you are interested in, click “more info” to read the campaign background and apply to the campaign. If you satisfy all the requirements, click “get started” to begin the application process. 

Note: Though your campaign rate is predetermined using factors such as the campaign budget, your social following size, and average engagement, there is an option to negotiate the rate you see on this page. 

The third and final tab, labeled “My Profile,” houses all of your personal information, including your contact information, demographic details, skills, brands and issues that interest you, and social media handles. Additionally, on the left-hand side of this page, you can access the “Payout Center,” where you can access and track your campaign earnings. You will also be able to access the “Referral Dashboard” which simply provides you with a custom referral link that allows our team to compensate you for inviting your friends and family to join People First along with your Settings. The settings tab allows you to change your notification preferences, password, and email.

If you have any questions or concerns while using the Creator Portal, be sure to click the chatbox on the bottom right of your screen. Live agents are online between 9:00 am EST and 6:00 pm EST from Monday through Friday!

We hope this deep dive into the Creator Portal helps you all maximize your experience with the platform. If you have any suggestions for how we can improve the Creator Portal, please feel free to send them our way via Instagram or Facebook. 

Creator Tip: SMS Notifications are Back~

Hey creators, are you signed up to receive SMS notifications from People First?

If not, be sure to sign up for SMS notifications!

These SMS notifications were created to help creators stay up-to-date with their campaigns. That being said, users who have a Creator Portal account and turn on SMS notifications will receive updates, via text message, when there is activity regarding their application or submission for campaigns.

As a reminder, SMS notifications are “non-reply,” which means we will be unable to respond to any messages. If you have any questions or concerns and would like to get in contact with a campaign representative, please reach out using the People First Chatbot located on the bottom right-hand corner of the Creator Portal screen (only available on desktop). 

For any of our creators interested in turning on or turning off SMS notifications, head over to your Profile via the Creator Portal and adjust the SMS notification settings.

Creator Tip: When to Post on Instagram…

It’s been a while since we posted tips and tricks for our creators to produce high-quality content and reach a large audience. In this week’s blog, we discuss posting times on Instagram and why they matter.

According to the online blog, “Later,” the best time to post on Instagram in 2023 is 4:00 AM when calculated local time across time zones, with the best day to post is Monday. 

This recommended posting time may vary depending on your goal as a creator.

  • If your goal as a creator is to generate higher engagement on metrics such as likes and comments, the best time to post is in the morning. 
  • However, if your focus as a creator is on videography and you utilize Reels, the best time to post is, again, at 4:00 AM and the best day to post is Monday.

The rule of thumb is to post earlier so you beat the competition and increase the likelihood of your content ending up on users’ feeds. 

Here is an in-depth list of the best times to post on Instagram during the week: 

  • Monday: 5:00 AM
  • Tuesday: 7:00 AM
  • Wednesday: 3:00 AM
  • Thursday: 3:00 AM
  • Friday: 7:00 AM
  • Saturday: 1:00 AM
  • Sunday: 1:00 AM

Feel free to download or screenshot this image to optimize your Instagram posting schedule:

For more information, check out the full article by clicking here.

Creator Tip: Stay in the Loop with People First

Hey Creators! Do you want to stay in the loop with People First? If so, be sure to follow our LinkedIn and other social channels — such as Instagram, Facebook, and Twitter — to hear news related to People First as a whole. In addition, don’t forget to check out our blog as well to read our newsletters or get the scoop on our campaigns and their impact. 

Links to People First’s Social Media Sites:

Creator Tip: Posting Frequency

Hey creators! We all know that it is important for you all to post frequently in order to engage with your audiences – the question is: how frequently should you be posting?

According to the Harvard Business Review, influencer posting frequency experiences a Goldilocks Effect, meaning audiences seek “just the right amount” of posts from creators. 

  • When influencers post too infrequently, their lack of posts, and thus presence on followers’ feeds, leads to an inability to build intimacy and trust.  
  • When influencers post too frequently, their excessive posts can clutter followers’ feeds, increasing audience disinterest and annoyance.

As such, People First recommends a medium level of posting frequency – which averages to around one to three posts a week. 

Also worth noting is that the brands, political advocacy groups, and nonprofit organizations that partner with People First often prefer to partner with everyday social media users, so often the best candidates for our campaigns tend to be those with a higher ratio of organic content. Too many paid partnerships can often be a turnoff, so don’t be afraid to be selective!

To learn more about influencer marketing, click here to read the full Harvard Business Review article.

Creator Tip: Payments

Do you have questions about payouts on the Creator Portal? Here are our tips when it comes to receiving payment quickly and easily:

  • Tip 1: Update the Payout Center on your Creator Profile
    • Now that we’ve streamlined payments through the Creator Portal, it’s very important to make sure all of your information in the payout center is correct and updated with the correct bank account/debit card and the last 4 digits of your social. This information is verified by the IRS and payment on the Creator Portal could be restricted if it’s not accurate. In some cases, Stripe might request extra information for verification, e.g. identity document or your full SSN. Once these are verified, your account should be all set for payment!
  • Tip 2: Get Paid After Publishing Your Content
    • Once you have received approval & instructions for posting your content, you should go ahead and post your content as soon as possible! Never post your content before receiving explicit approval from a People First Representative. 
    • From there, publish the link to your live content on the Creator Portal. Please ensure that you are submitting the link to your post, and not your profile. Once this link has been submitted, a People First Representative will review your post to ensure that you have posted only the approved assets, and followed all of the instructions for posting. 
    • From there, you can expect to receive payment within 10-15 business days. Please allow an additional 1-2 days for the payout to hit your bank account. 
    • Failure to follow instructions for posting may lead to payment delays, so please ensure you’re reviewing your directions carefully. 
  • Tip 3: Determining your Rate
    • When applying to a new campaign, all creators have the option to suggest an alternative rate for the partnership.
    • The rate that is recommended to you varies across campaigns, as this rate is determined by the campaign’s budget, as well as your following size and the number of engagements you typically receive on each post. Keep in mind that People First offers competitive rates for creators with smaller followings, but higher engagement rates. 
    • A People First Representative will contact you via email or SMS if we believe your profile is a fit for the campaign, but we would like to negotiate a different rate for your partnership. 
    • If you and your People First Representative can come to an agreement about your rate, your application will likely be approved and you’ll be able to continue on with the partnership!
    • Please keep in mind that People First is a micro-influencer agency, and we may not be able to accommodate rates for macro-influencers.
  • Tip 5: Apply to Campaigns that Apply to You!
    • People First offers a variety of political and commercial campaigns that source creators from all backgrounds. However, some campaigns are limited to people of a certain age, race, gender, or region. Additionally, some campaigns may even require a People FIrst representative to confirm specific aspects about your circumstances, such as whether you’re a parent to a child between the ages of 10-14, or have experience cooking Keto meals! Be on the lookout for those emails, as we’ll need to hear from you first before we can approve your application.

Creator Tip: Finding a Niche

Hey there creators!

As our creator portal platform continues to expand and build, we have a new tip:

Creators should focus on their own niche, and really read through all the available campaigns we have when applying to our opportunities. So remember: Only apply to campaigns that apply to you! This not only helps with progressing the speed of your application, but makes it easier for communication between agents and creators. 

Make sure you are reading through all the guidelines for your account to have when filling out an application, and being fair with the pricing negotiation. An unfair pricing negotiation can really ruin your opportunity for a campaign you could be a perfect fit for! 

Thanks for reading, and hope to see you on the creator portal!

Creator Tip: Things to Get You Started

What’s up, creator community?

At People First, we’re so excited to have launched our Creator Portal! On the new website, creators like yourself can apply for multiple campaigns, submit content, and get paid-all in the same place! Like most things, change can take some getting used to and can even be confusing at times! We want all creators to be able to have a smooth experience on the Creator Portal, so here are some tips and tricks!

  • Tip 1: Log onto the Creator Portal from a desktop or laptop
    • Currently, the Creator Portal is best suited for computer devices. Don’t worry though! We understand that as creators, you may use mobile devices a lot to create your content. A mobile version is on the way!  
  • Tip 2: Apply for campaigns for consideration
    • At People First, we love talking about our current campaigns! You may hear about them via email or on social media to keep you informed. If there’s one that piques your interest, head over to the Creator Portal to apply! You’ll know that your application has been fully completed once you see “Application Under Review” on your screen. 
  • Tip 3: Patience is key!
    • The content submission process can take some time! Once you’ve uploaded your content to the Creator Portal, your content will then be sent to the client for review. Please note that this process can take up to a couple of weeks! We haven’t forgotten about you! Someone will be in touch with you once your content and caption are approved with the next steps to go live!

Creator Tip: Social Media 101

We at People First are fortunate to work with thousands of people from all over the country to join our campaigns and raise their voice. However, content creation looks different for everyone, which is why we’ve put together a list of tips for new and experienced content creators to make your social media pages better than ever ! 

These tips are a great way not only to build a bond with your community and increase engagement, but help make your experience working with People First as seamless as possible. Feel free to take what resonates with you!

  • Tip 1: Get With the Trends
    • Be in-touch with current trends and hashtags. Join the movement by contributing your own take, or putting a spin on someone else’s work. 
    • Being real is in! We want you to have fun with your content, so don’t be afraid to be yourself. Creating content that reflects your personality is what social media is all about!
    • Be careful that the trend you’re hopping onto isn’t something that’s going to be seen as harmful or offensive. People First, and many of the brands we work with, are reluctant to work with anyone that uses offensive language or imagery. 
  • Tip 2: Monitor Your Own Performance
    • Utilize engagement tracking services to see what works well for your audience and what does not. See if you can find any patterns about what’s working, and what pieces can be improved. 
    • Be transparent. Pivoting your approach to content creation is normal, and being transparent about this will allow for you to create trust between you and your community.
  • Tip 3: Post Consistently
    • If you’re in the process of growing your following, we recommend posting to Instagram at least 3x a week, along with regular stories highlighting smaller pieces.
    • For TikTok, we recommend posting twice a week and capitalizing off of existing trends and audios. These are most likely to be recognized and pick up more engagement!
  • Tip 4: Vary Your Content
    • Positing consistently is great for those looking to expand their audience, but failing to vary your content can lead to people following off. 
    • We encourage you to space out your sponsorship deals, to fill those gaps with organic pieces. This allows for your followers to see a more genuine and authentic side to you, without being bombarded with paid partnerships. 
  • Tip 5: Be Proud of Honest Engagement
    • When working on paid social media partnerships, it’s extremely important that your audience, and the engagements you receive, are from real social media users. 
    • Why? Fake followers, likes, and comments are not a true measure of success and they will make clients hesitant to work with you. And yes – they are very easy to spot. 
    • Believe in the power of the micro influencer! Content creators with smaller audiences tend to have better relationships with their following, which lends to better engagement rates overall. Here at People First, we take this into consideration when determining a suggested rate for partnerships, so that you can be compensated fairly in light of a smaller follower base, 

Creator Tip: Reels Play Bonus

In 2020, Instagram released Instagram Reels, which has changed the way many people create, discover, and share short, entertaining videos online today. But now, Instagram wants to give back to the people who made Instagram Reels such a success, by introducing the Reels Play Bonus!

For years, partnering with brands or affiliate marketing groups were some of the only ways to get paid for creating Reels. However, things are starting to look different. Due to the popularity of Reels, Meta is in the midst of finding new ways to pay creators for their work. 

For instance, there are embedded advertisements available for creators that have more than 10,000 followers in over 50 countries. These overlay ads give creators 55% of the rewards. 

Another exciting feature is creators will be able to receive “stars” on their Reels from viewers. Each “star” received is an equivalent to a cent in earned revenue.

There’s currently another new way for creators to receive payment for their content from Meta. The company has recently announced the Reels Bonus Play Program. This program provides a “bonus” revenue outside of the Instagram creator fund to creators and influencers whose Reels get at least 1,000 views over a 30 day period. The Reels Play Bonus pays can pay creators as much as up to $35,000 per month, however, it’s an invite-only feature. 

After the Reels Play Bonus is accessible to you, the opportunity is available to you for 30 days. As a creator, you have the option to choose any number of Reels to count toward the Reels Play Bonus earnings during those 30 days. Your bonus payout will be determined by the performance of your Reels. 

Creator Tip: Make Your Instagram Account Public!

Do you know that feeling when your friend DMs you a funny Instagram post, but you can’t see it because the account is private?

Getting around this can be such a hassle, which is why we suggest that you make your Instagram account public. Opening up your account to the public allows potential followers to scroll through your content, share it with their friends, or even be featured on the Explore page.

This leads to even more eyes and engagements with each of your posts!

Here at People First, did you know that it’s actually required to make your account public before partnering with us? Our team of organizers want to ensure that your account is a match for the partnership, which is why we ask that you turn this feature on before applying. 

Not sure if your Instagram account is public or not? No worries. 

  1. Open up the Instagram app.
  2. Go to your profile. In the top right corner, open your settings.
  3. Click on privacy settings.
  4. At the top, there’s a button that shows you whether or not your account is private. If it’s currently set to private, switch your account to public.

That’s all there is to it!